10:42 Am Emulator: Emulator: Error: X86 Emulation Currently Requires Hardware Acceleration!
The Android Emulator can use hardware acceleration features to improve performance, sometimes drastically. This folio describes how you can configure graphics and virtual machine (VM) acceleration to get higher performance from the emulator.
Configure graphics acceleration
Graphics acceleration uses your computer's hardware (typically the GPU) to make screen rendering faster. Android devices use OpenGL for Embedded Systems (OpenGL ES or GLES) for rendering both second and 3D graphics on the screen.
When you create an Android Virtual Device (AVD) in the AVD Manager, you tin can specify whether the emulator should utilise hardware or software to emulate the GPU of the AVD. Hardware acceleration is recommended and is typically faster. However, you might need to apply software acceleration if your computer uses graphics drivers that aren't compatible with the emulator.
Past default, the emulator decides whether to use hardware or software graphics acceleration based on your computer setup. If your GPU hardware and drivers are compatible, the emulator uses the GPU. Otherwise, the emulator uses software acceleration (using your computer's CPU) to simulate GPU processing.
If y'all start the emulator from the command line, you tin can as well override the graphics acceleration setting in the AVD for that virtual device instance.
Requirements
To use graphics dispatch, your development environs must meet the following requirements:
- SDK Tools: Latest release recommended (version 17 minimum)
- SDK Platform: Latest release recommended (Android iv.0.3, Revision 3, minimum)
Configure graphics acceleration in the AVD Manager
To configure graphics acceleration for an AVD, follow these steps:
- Open the AVD Manager.
- Create a new AVD or edit an existing AVD.
- On the Verify Configuration folio, find the Emulated Performance department.
- Select a value for the Graphics: choice.
- Click Finish.
Configure graphics dispatch from the command line
To specify a graphics acceleration type when you run an AVD from the command line, include the -gpu option, as shown in the following example:
emulator -avd avd_name -gpu manner [{-choice [value]} ... ] The value of fashion can exist set to ane of the following options:
-
car: Allow the emulator choose betwixt hardware or software graphics acceleration based on your computer setup. -
host: Use the GPU on your computer for hardware dispatch. This option typically provides the highest graphics quality and performance for the emulator. However, if your graphics drivers have issues rendering OpenGL, yous might need to use theswiftshader_indirectorangle_indirectoptions. -
swiftshader_indirect: Use a Quick Kick-uniform variant of SwiftShader to render graphics using software acceleration. This option is a good alternative tohostmode if your estimator can't utilize hardware acceleration. -
angle_indirect: (Windows but) Apply a Quick Boot-uniform variant of ANGLE Direct3D to render graphics using software acceleration. This option is a good alternative tohostmode if your computer tin't use hardware dispatch. In nearly cases, Bending performance should exist like to usinghostfashion because Angle uses Microsoft DirectX instead of OpenGL. On Windows, Microsoft DirectX drivers typically have fewer issues than OpenGL drivers. This choice uses Direct3D 11 and requires Windows ten, Windows 8.1, or Windows vii SP1 with the Windows vii Platform Update. -
guest: Utilise guest-side software rendering. This option provides the lowest graphics quality and functioning for the emulator.
The following mode options are deprecated:
-
swiftshader: Deprecated in version 27.0.ii Utilizeswiftshader_indirectinstead. -
angle: Deprecated in version 27.0.2. Useangle_indirectinstead (Windows only). -
mesa: Deprecated in version 25.3. Utilizeswiftshader_indirectinstead.
Enable Skia rendering for Android UI
When using images for API level 27 or higher, the emulator can return the Android UI with Skia. Skia helps the emulator render graphics more smoothly and efficiently.
To enable Skia rendering, utilise the following commands in adb shell:
su setprop debug.hwui.renderer skiagl finish start Configuring VM acceleration
VM acceleration uses your estimator's processor to significantly improve the execution speed of the emulator. A tool called a hypervisor manages this interaction using virtualization extensions that your computer'southward processor provides. This section outlines the requirements for using VM acceleration and describes how to set up VM dispatch on each operating system.
General requirements
To use VM acceleration with the emulator, your reckoner must meet the general requirements in this section. Your computer also needs to come across other requirements that are specific to your operating system.
Development environs requirements
To apply VM acceleration, your development environment must encounter the following requirements:
- SDK Tools: minimum version 17; recommended version 26.1.1 or afterwards
- AVD with an x86-based system image, available for Android 2.3.3 (API level 10) and higher
Virtualization extension requirements
In addition to the evolution environment requirements, your computer's processor must support i of the post-obit virtualization extensions technologies:
- Intel Virtualization Technology (VT, VT-x, vmx) extensions
- AMD Virtualization (AMD-V, SVM) extensions
Most mod processors back up these virtualization extensions. If you're non certain whether your processor supports these extensions, check the specifications for your processor on the manufacturer'due south site. If your processor doesn't support one of these extensions, then you can't use VM acceleration.
Restrictions
VM acceleration has the post-obit restrictions:
- You can't run a VM-accelerated emulator within another VM, such as a VM hosted by VirtualBox, VMWare, or Docker. You must run a VM-accelerated emulator direct on your host computer.
- Depending on your operating system and hypervisor, you can't run software that uses another virtualization technology at the same time that you run a VM-accelerated emulator. For case, VirtualBox, VMWare, and Docker currently apply a different virtualization technology, so you can't run them at the same fourth dimension as the accelerated emulator.
About hypervisors
VM acceleration requires a hypervisor.
Without a hypervisor and VM acceleration, the emulator must interpret the car code from the VM block by block to adapt to the architecture of the host figurer. This process can exist quite slow. With a hypervisor, the VM and the compages of the host calculator lucifer, and then the emulator can run code directly on the host processor using the hypervisor. This improvement drastically increases both the speed and performance of the emulator.
The hypervisor that will work best for y'all depends on your computer's operating system and configuration. For more than information, see one of the following sections:
- Configure VM acceleration on Windows
- Configure VM acceleration on macOS
- Configure VM acceleration on Linux
Check if a hypervisor is installed
You tin can utilise the emulator -accel-check command-line option to bank check if a hypervisor is currently installed on your figurer.
The following examples prove how to use the emulator accel-bank check choice. In each case, Sdk is the location of the Android SDK:
Windows:
c:\Users\janedoe\AppData\Local\Android> Sdk\emulator\emulator -accel-check accel: 0 HAXM version 7.3.two (4) is installed and usable. accel
macOS:
janedoe-macbookpro:Android janedoe$ ./Sdk/emulator/emulator -accel-check accel: 0 HAXM version 7.3.two (4) is installed and usable. accel
Linux:
janedoe:~/Android$ ./Sdk/emulator/emulator -accel-check accel: 0 KVM (version 12) is installed and usable.
Configure VM dispatch on Windows
VM dispatch on Windows can employ one of iii hypervisors: the Intel Hardware Accelerated Execution Director (HAXM), the Android Emulator Hypervisor Driver for AMD Processors or the Windows Hypervisor Platform (WHPX).
Choose a hypervisor on Windows
Apply the following criteria to determine which hypervisor you should use:
| Criteria | Hypervisor |
|---|---|
| You accept an Intel processor and do not need to run Hyper-Five at the same time as the Android Emulator. | Use Intel HAXM. |
| You lot have an Intel processor and do need to run Hyper-Five at the same fourth dimension as the Android Emulator. | Apply WHPX. |
| Yous take an AMD processor and do not need to run Hyper-V at the same time as the Android Emulator. | Use Android Emulator Hypervisor Driver for AMD Processors. |
| Yous accept an AMD processor and do need to run Hyper-V at the same fourth dimension every bit the Android Emulator. | Use WHPX. |
Double-bank check when disabling Hyper-Five
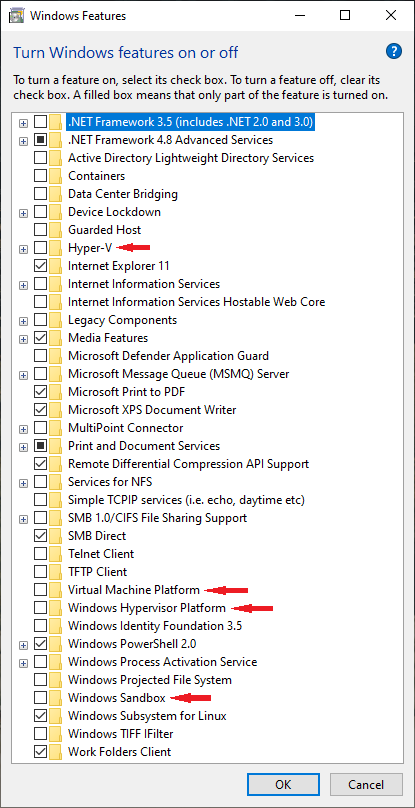
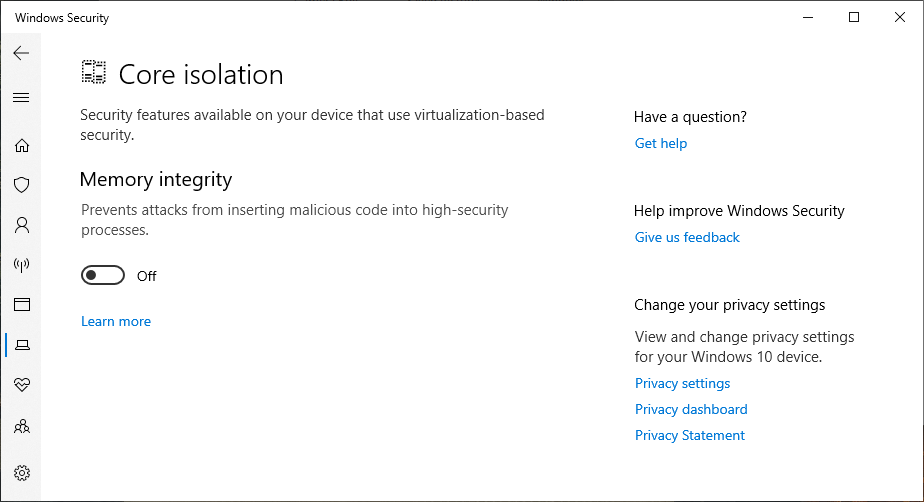
Hyper-5 must be disabled to utilize Intel HAXM or the Android Emulator Hypervisor Commuter for AMD Processors. However, unchecking "Hyper-V" in Windows Features Dialog might not guarantee that Hyper-V is disabled. Quite a few features in Windows 10 volition enable Hyper-V implicitly. Users may not even know Hyper-V is activated when they enable one of these features.
To our best knowledge, these includes Virtual Motorcar Platform, Windows Hypervisor Platform, Windows Sandbox, Cadre Isolation, Credential Guard. Additionally, Windows Subsystem for Linux version 2 requires Virtual Machine Platform, meaning that it implicitly requires Hyper-V. This list is not exhaustive, please notify us on our bug tracker if you detect an particular that should be included here.
Double-cheque that the features listed higher up are also disabled when disabling Hyper-V. Reference Microsoft documentation and the examples below to find out how each individual feature can exist disabled.
Some platforms fail to immediately disable Hyper-Five when information technology is switched off. When this occurs, there is no error returned by the Windows OS and Hyper-V appears disabled in the Windows Features Dialog. Please file a bug on Microsoft'south consequence tracker when this occurs.
Configure VM acceleration using Intel HAXM on Windows
Earlier yous can install and use Intel HAXM, your computer must run into the following requirements:
- Intel processor with Virtualization Engineering (VT-x), Intel EM64T (Intel 64) features, and Execute Disable (XD) Bit functionality enabled
- 64-scrap Windows 10, Windows 8, or Windows 7 (or 32-bit version of the operating arrangement on a 64-bit processor)
- To use Intel HAXM on Windows 10 or 8, you must turn off Hyper-V in the Windows Features Dialog.
Note: Installing certain software might turn Hyper-V back on. Refer to Disabling Hyper-V for more details.
To install the Intel HAXM driver, follow these steps:
- Open the SDK Manager.
- Click the SDK Update Sites tab and then select Intel HAXM.
- Click OK.
- Later on the download finishes, run the installer. Typically, you can find the installer in the following location:
sdk\extras\intel\Hardware_Accelerated_Execution_Manager\intelhaxm-android.exe - Use the magician to complete the installation.
-
Subsequently installing Intel HAXM, ostend that the virtualization driver is operating correctly past entering the following command in a Command Prompt window:
sc query intelhaxmY'all should meet a status bulletin that includes the post-obit information:
SERVICE_NAME: intelhaxm ... State : 4 RUNNING ...
For more information, see Installation Instructions for Intel HAXM on Windows.
You can arrange the corporeality of retentivity available to the Intel HAXM kernel extension by running the installer again.
Yous tin uninstall Intel HAXM using either the installer or the Windows Control Panel. Earlier you lot uninstall Intel HAXM, shut down any x86 emulators that are currently running.
Configure VM acceleration using Android Emulator Hypervisor Driver for AMD Processors on Windows
Before you can install and use the Android Emulator Hypervisor Driver for AMD Processors, your computer must run across the post-obit requirements:
- AMD processor with Secure Virtual Machine (SVM) Technology
- 64-bit Windows 10, Windows 8, or Windows seven (32-scrap Windows is non supported)
- To utilise Android Emulator Hypervisor Driver for AMD Processors on Windows ten or 8, you must turn off Hyper-V in the Windows Feaures Dialog.
Note: Installing certain software might plough Hyper-Five back on. Refer to Disabling Hyper-V for more than details.
The Android Emulator Hypervisor Driver for AMD Processors tin can be installed via the SDK Manager in Android Studio 4.0 Canary five or after, or from Github (see beneath). To install from the SDK Manager, follow these steps:
- Open Tools->SDK Manager.
- Click the SDK Tools tab and so select Android Emulator Hypervisor Driver for AMD Processors.
- Click OK to download and install the Android Emulator Hypervisor Driver for AMD processors.
-
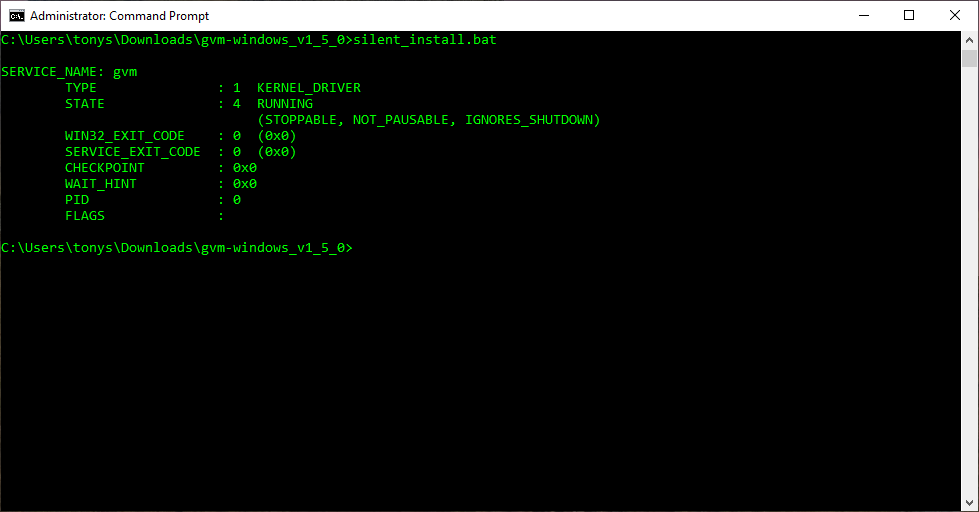
Afterwards installation, confirm that the commuter is operating correctly by entering the following control in a Command Prompt window:
sc query gvmYou lot should run across a status message that includes the following information:
SERVICE_NAME: gvm ... State : 4 RUNNING ...The following error message means either that SVM is not enabled in your BIOS or that Hyper-V is not disabled (Refer to Disable Hyper-5).
SERVICE_NAME: gvm ... Country : i STOPPED WIN32_EXIT_CODE : 4294967201 (0xffffffa1) ...
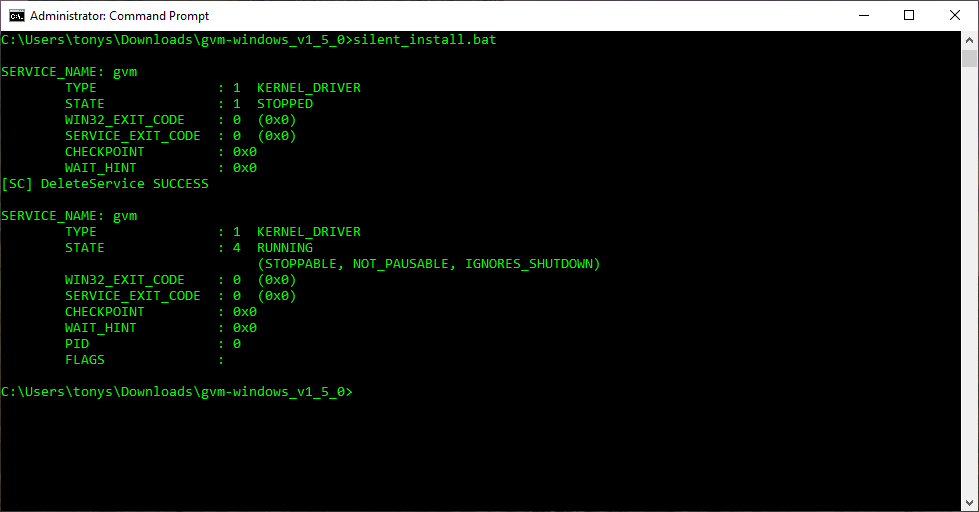
The Android Emulator Hypervisor Driver for AMD Processors can also be downloaded and installed from github. After unpacking the driver bundle, run "silent_install.bat" in a Control Prompt with Ambassador privileges. Successfully completing a new installation would have the post-obit output:
Upgrading an installation would consequence in the following output, which includes messages regarding the old driver's uninstallation:
You can uninstall Android Emulator Hypervisor Driver for AMD Processors using the post-obit commands in a Command Prompt with Administrator privileges.
sc stop gvm sc delete gvm Note: Shut downwardly whatsoever x86 emulators before uninstalling the Android Emulator Hypervisor Driver for AMD Processors.
Configure VM acceleration using Windows Hypervisor Platform
Before you tin enable WHPX, your figurer must come across the post-obit requirements:
- Intel processors: Support for Virtualization Engineering (VT-x), Extended Folio Tables (EPT), and Unrestricted Guest (UG) features. VT-x must exist enabled in your computer'south BIOS settings.
- AMD processors: AMD Ryzen processor recommended. Virtualization or SVM must be enabled in your computer's BIOS settings.
- Android Studio three.two Beta 1 or college (download from developer.android.com)
- Android Emulator version 27.three.8 or higher (download using the SDK Managing director)
- Windows x with April 2018 Update or higher
To install WHPX on Windows, follow these steps:
- From the Windows desktop, right-click the Windows icon and select Apps and features.
- Nether Related settings, click Programs and Features.
- Click Turns Windows Features on or off.
-
Select Windows Hypervisor Platform
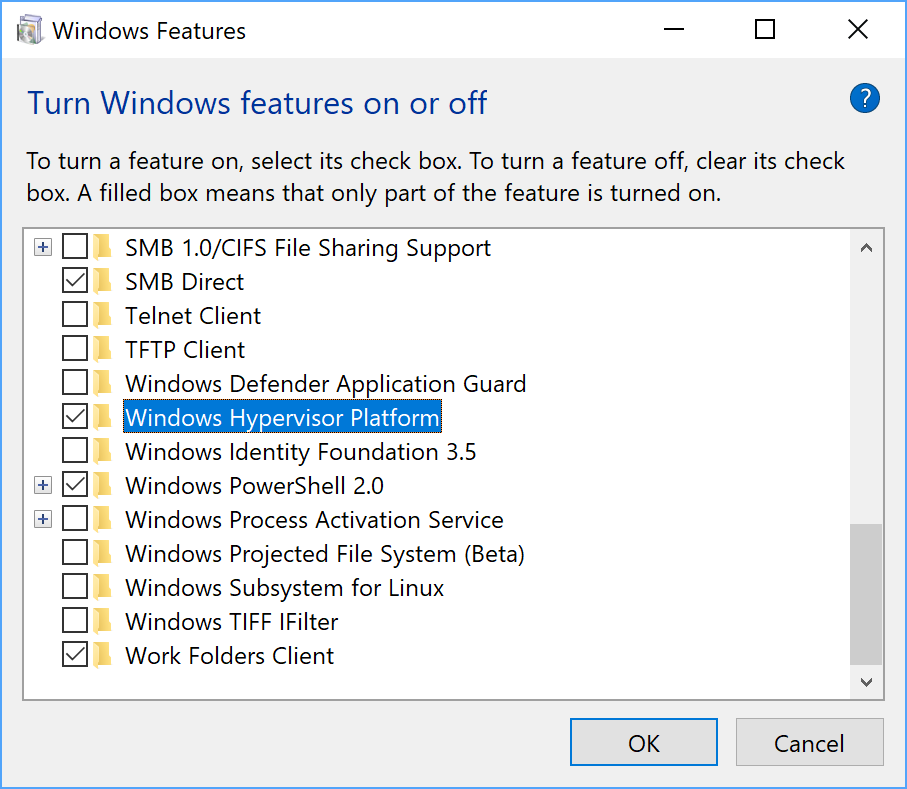
-
Click OK.
-
Once the installation has finished, restart your computer.
Configure VM acceleration on macOS
On Mac OS X v10.10 Yosemite and higher, the Android Emulator uses the congenital-in Hypervisor.Framework by default, and falls back to using Intel HAXM if Hypervisor.Framework fails to initialize.
To utilize VM acceleration on macOS when the Hypervisor.Framework is not available, you must install the Intel HAXM kernel extension.
To install the Intel HAXM kernel extension, follow these steps:
- Open the SDK Managing director.
- Click the SDK Update Sites tab and so select Intel HAXM.
- Click OK.
- After the download finishes, run the installer. Typically, y'all can notice the installer in the following location:
sdk/extras/intel/Hardware_Accelerated_ExecutionDirector/IntelHAXM version.dmg - Follow the on-screen instructions to consummate the installation.
-
After installation finishes, confirm that the new kernel extension is operating correctly by opening a last window and running the post-obit command:
kextstat | grep intel
Y'all should meet a status message containing the post-obit extension name, indicating that the kernel extension is loaded:
com.intel.kext.intelhaxm
For more information, run into Installation Instructions for Intel HAXM.
You can adjust the amount of retention available to the Intel HAXM kernel extension past running the installer again.
You can end using the Intel HAXM kernel extension by uninstalling it. Before you uninstall information technology, shut down whatsoever x86 emulators that are currently running, then run the post-obit command in a terminal window:
sudo /System/Library/Extensions/intelhaxm.kext/Contents/Resources/uninstall.sh
Configure VM acceleration on Linux
Linux-based systems support VM acceleration through the KVM software package. Follow the instructions for installing KVM on your Linux organisation, and verify that KVM is enabled. For Ubuntu systems, see Ubuntu KVM Installation.
Requirements
Running KVM requires specific user permissions. Make sure that you have sufficient permissions every bit specified in the KVM installation instructions.
To use VM dispatch on Linux, your reckoner must also encounter these requirements:
- For Intel processors: Support for Virtualization Technology (VT-x), Intel EM64T (Intel 64) features, and Execute Disable (XD) Bit functionality enabled.
- For AMD processors: Support for AMD Virtualization (AMD-V).
Check whether KVM is currently installed on Linux
You can use the emulator -accel-bank check command-line pick to check whether you accept KVM installed. Alternatively, you lot can install the cpu-checker package containing the kvm-ok command.
The following instance shows how to use the kvm-ok command.
-
Install the
cpu-checkerparcel:$ sudo apt-become install cpu-checker $ egrep -c '(vmx|svm)' /proc/cpuinfoAn output of 1 or greater ways that virtualization is supported. An output of 0 means that your CPU doesn't support hardware virtualization.
-
Run the
kvm-okcommand:$ kvm-okExpected output:
INFO: /dev/kvm exists KVM acceleration can be usedIf you get the following error, information technology means that you can notwithstanding run virtual machines. Your virtual automobile will exist slower without the KVM extensions.
INFO: Your CPU does non support KVM extensions KVM acceleration can NOT be used
Install KVM on Linux
Utilize the following command to install KVM:
Cosmic (18.10) or later
sudo apt-go install qemu-kvm libvirt-daemon-organization libvirt-clients bridge-utils
Lucid (x.04) or later
sudo apt-get install qemu-kvm libvirt-bin ubuntu-vm-builder span-utils
Karmic (9.10) or earlier
sudo aptitude install kvm libvirt-bin ubuntu-vm-builder bridge-utils
0 Response to "10:42 Am Emulator: Emulator: Error: X86 Emulation Currently Requires Hardware Acceleration!"
Post a Comment